Set up
Before starting, make sure you follow the Get started guide, where you'll find what's needed for integration.
Prerequisites
| Release | Release date | React Native | React | Expo |
|---|---|---|---|---|
| 4.0 | December, 2025 | ~0.79 | ~19 | ~53 |
| 3.0 | August, 2025 | ~0.79 | ~19 | ~53 |
| 2.5 | February, 2025 | ~0.76.3 | ~18.3.1 | ~53 |
Installation
The first step is to install the Weavr Push Provisioning SDK as a dependency of your app:
- npm
- yarn
npm install @weavr-io/push-provisioning-react-native
yarn add @weavr-io/push-provisioning-react-native
You'll need to configure the iOS and Android native projects within your app, as Push Provisioning requires native capabilities.
Set up the iOS project
Configure CocoaPods
Add a the following sources within your Podfile:
source 'https://gitlab.com/phyreapp/ios-specs.git'

# rest of your Podfile
# …
Then, update your targets dependencies by adding:
pod 'WeavrPushProvisioning', :git => 'https://github.com/weavr-io/push-provisioning-ios', :tag => '4.0.0'
Note: You'll have to manually update this version when updating the RN SDK so it keeps in sync with our iOS SDK.
Mandatory: Adding provisioning_config file
For the correct functioning of the SDK, a configuration file is required to initialise dependencies.
Please contact the support team at support@weavr.io to obtain this file.
Important: The file must be named exactly provisioning_config (no extension) and placed at build time in the appropriate location for each platform:
- Android:
android/app/src/main/res/raw/provisioning_config - iOS: Anywhere in iOS bundle (e.g.,
ios/MyApp/assets/) and added to app and extension targets
The SDK fails initialization if this file is missing.
Example CI injection for Android:
echo "$WEAVR_PROVISIONING_CONFIG_B64" | base64 --decode > android/app/src/main/res/raw/provisioning_config
Ensure that the provisioning_config file is included in the final application bundle. If you use a clean-up script to remove secrets after the build, ensure it runs after the packaging process is complete.
Set up the Xcode project
- Ensure Xcode 16.4 or newer is installed.
- Verify Swift 5.9 or newer is configured.
- Add
provisioning_configto your app target and any Wallet Extension targets that interact with Apple Pay. - For Wallet Extensions, ensure proper entitlements and capabilities are set.
Finally, run pod install in the iOS project directory:
cd ios
pod install
Set up your app for Push Provisioning
A requirement of iOS Push Provisioning with Apple, is for your mobile app to complete the Entitlement process.
The first step is to add the requirement capabilities and Entitlements to your app.
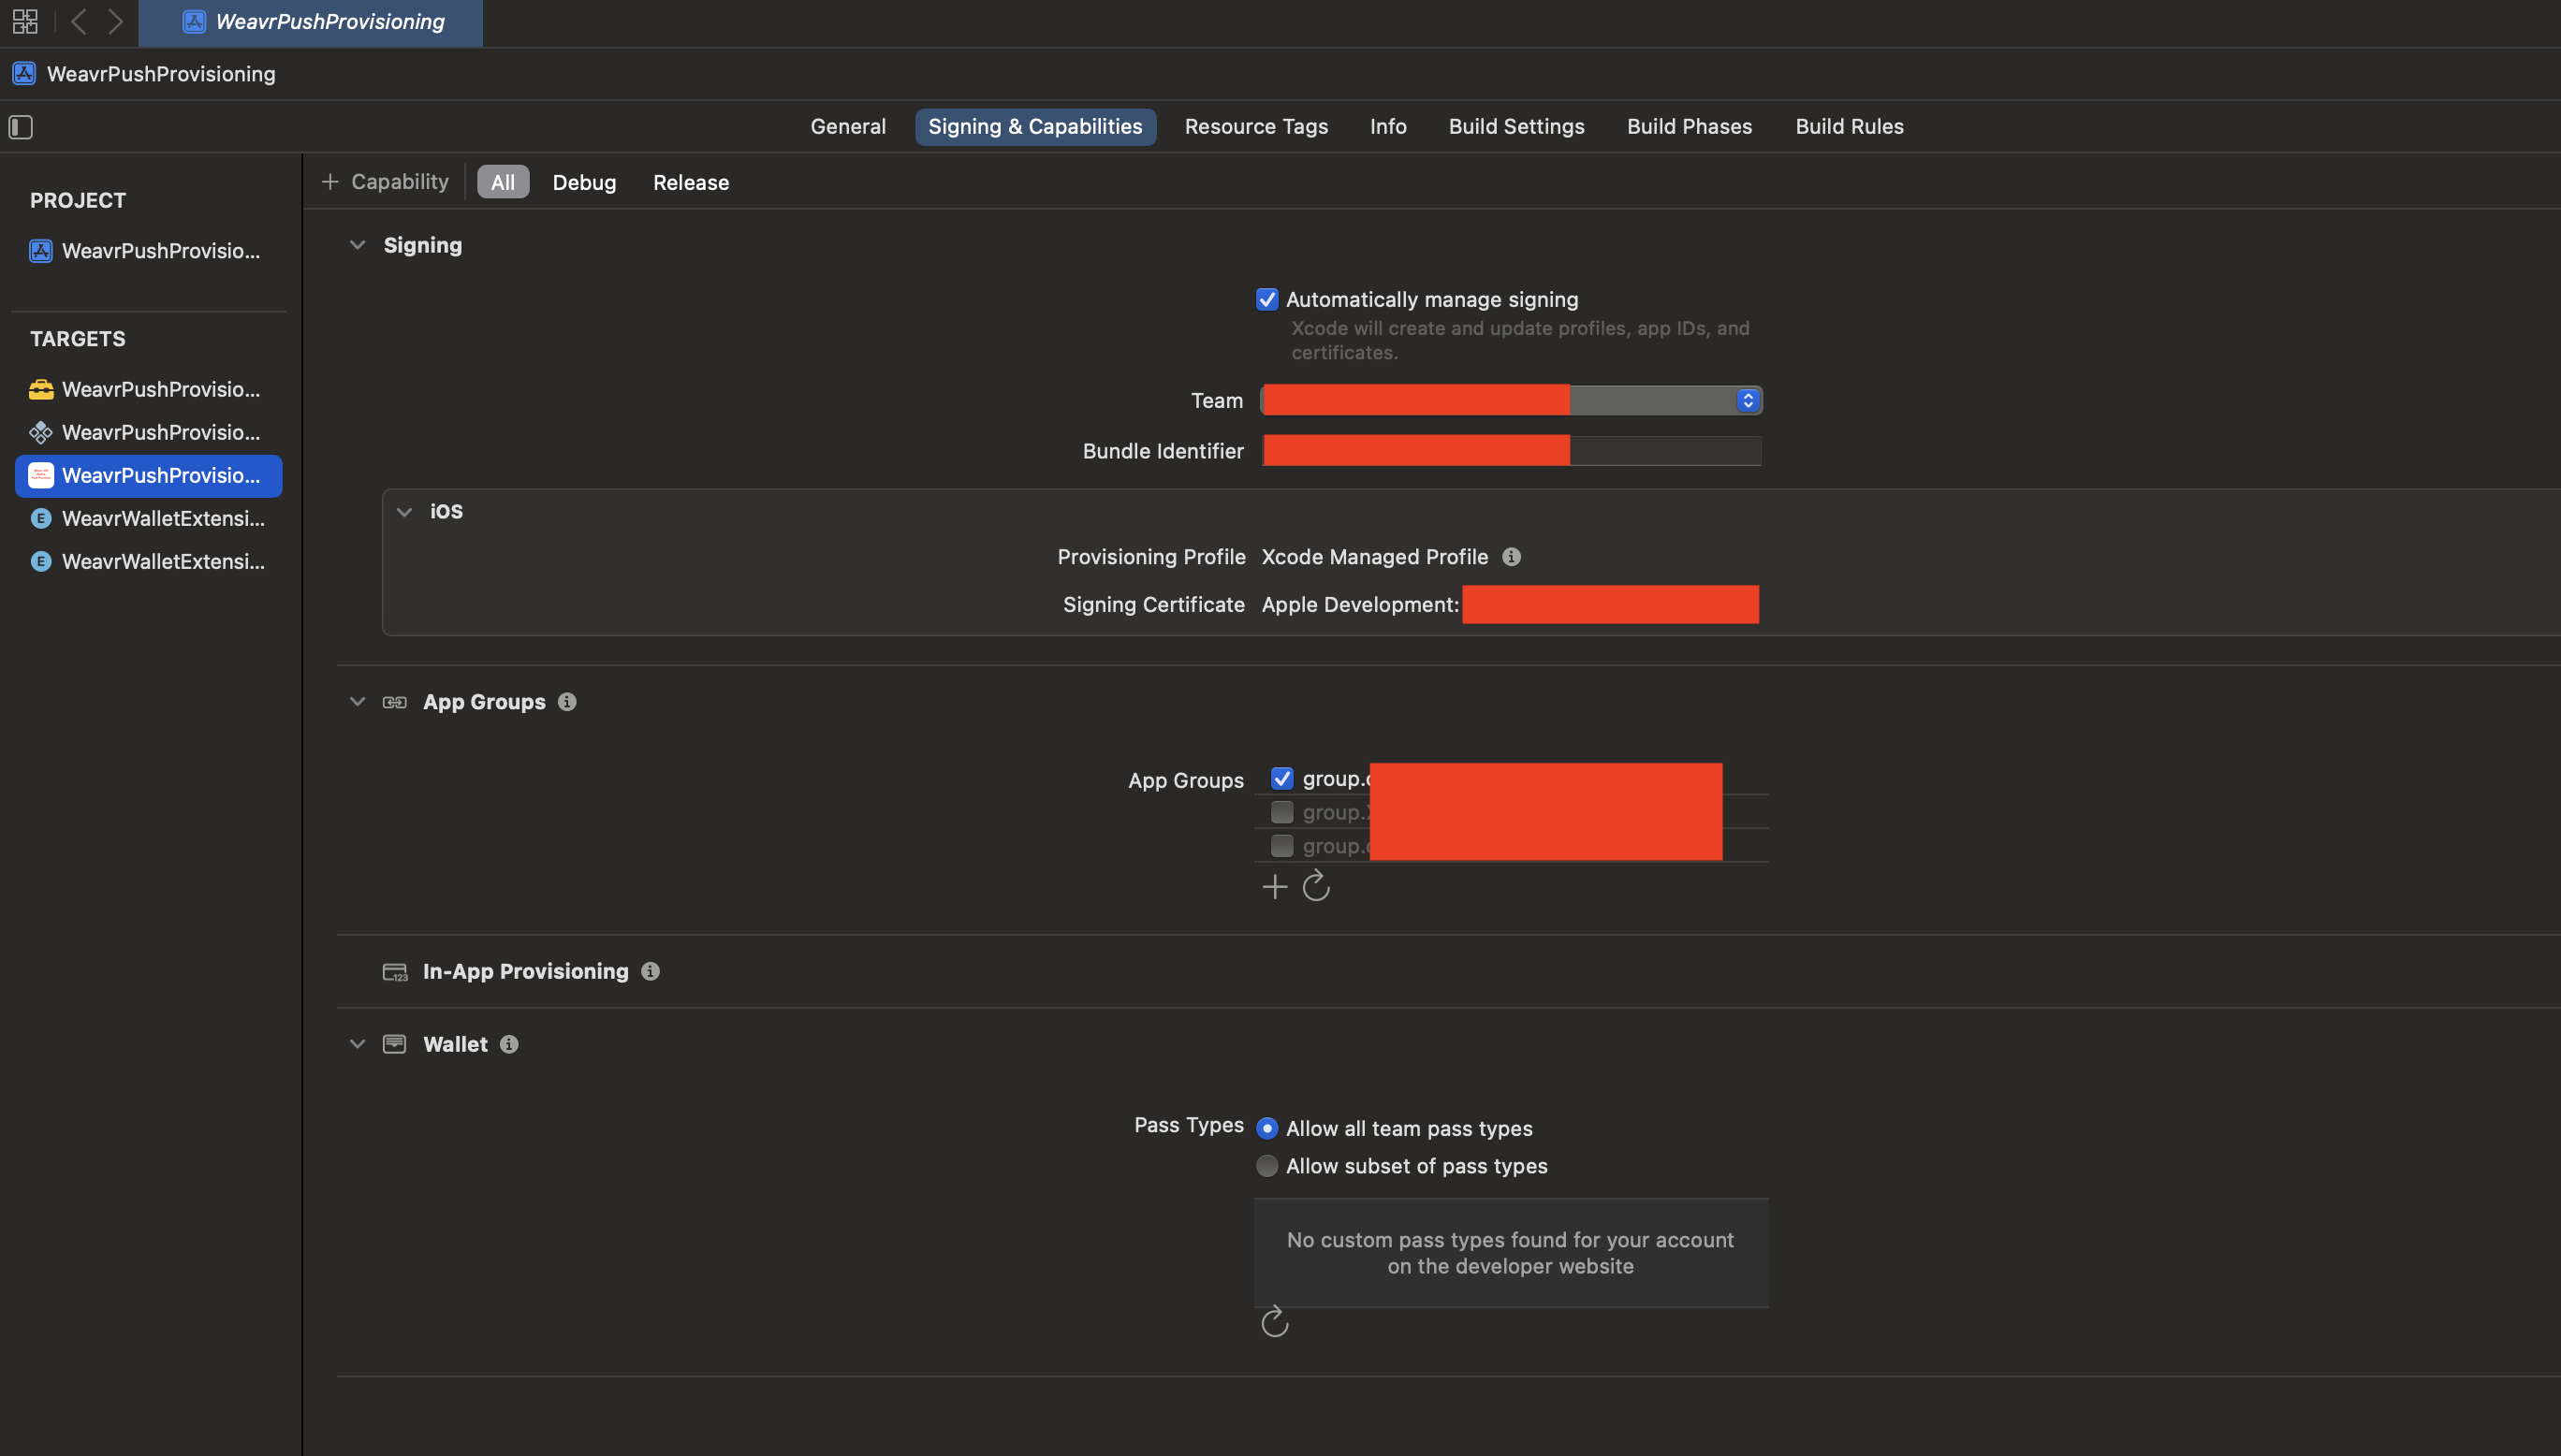
Navigate to the project containing your app in Xcode, and select your App's target, then navigate to the tab Signing & Capabilities.
Here, ensure you have the following capabilities enabled:
- App Groups: To allow the Wallet Extensions to access the storage of your app.
- In-App Provisioning: To allow to provision cards from within your app.
- Wallet, including Allow all team pass types: To check the status of the cards within Apple Pay, and
decide whether to display the
AddToWalletButton.
To be able to provision a card successfully, Apple requires you to:
- Distribute the app via TestFlight
- Ensure that the application ID and provisioning profiles you use to distribute your builds, have access to all capabilities described earlier.
Once your project is configured correctly, your target should look like this:
Set up the Android project
Configure maven repositories
The SDK is distributed via a private GitHub Packages repository. You need to configure your project to authenticate and download the SDK.
1. Obtain credentials
Get in touch with our support team at support@weavr.io to obtain:
- GitHub username or email
- GitHub Personal Access Token (with
read:packagespermission)
2. Create secrets.properties
Create a secrets.properties file at the root of your Android project (e.g., android/secrets.properties) to store these credentials securely.
Do not commit this file to version control. Add it to your .gitignore.
WEAVR_GITHUB_USERNAME=your-github-username
WEAVR_GITHUB_TOKEN=ghp_xxxxxxxxxxxxxxxxxxxx
4. Update .gitignore
Ensure you don't commit sensitive files to version control:
android/secrets.properties
android/app/src/main/res/raw/provisioning_config
General security best practices
- Store Secrets Safely: Store UI keys, repo credentials, and provisioning config inputs in your CI/CD secret storage.
- Rotate Tokens: Rotate GitHub tokens on a regular schedule.
- Do Not Commit Configs: Never commit the
provisioning_configfile to version control; use CI/CD secrets management to inject it at build time.
3. Update settings.gradle
Update your android/settings.gradle (or settings.gradle.kts) file to include the Weavr GitHub Packages repository.
- Groovy (settings.gradle)
- Kotlin (settings.gradle.kts)
def keystorePropertiesFile = new File(settingsDir, "secrets.properties")
if (!keystorePropertiesFile.canRead()) {
    throw new GradleException(
        "secrets.properties is required. " +
        "Please contact support@weavr.io to obtain GitHub packages credentials."
    )
}
def keystoreProperties = new Properties()
keystoreProperties.load(new FileInputStream(keystorePropertiesFile))

dependencyResolutionManagement {
    repositoriesMode.set(RepositoriesMode.FAIL_ON_PROJECT_REPOS)
    repositories {
        google()
        mavenCentral()

        // Weavr GitHub Packages repository
        maven {
            url = uri("https://maven.pkg.github.com/weavr-io/push-provisioning-android")
            name = "Weavr-GitHub-Packages"
            credentials {
                username = keystoreProperties['WEAVR_GITHUB_USERNAME']
                password = keystoreProperties['WEAVR_GITHUB_TOKEN']
            }
        }
    }
}
val keystorePropertiesFile = File(settingsDir, "secrets.properties")
if (!keystorePropertiesFile.canRead()) {
    throw GradleException(
        "secrets.properties is required. " +
        "Please contact support@weavr.io to obtain GitHub packages credentials."
    )
}
val keystoreProperties = java.util.Properties()
keystoreProperties.load(java.io.FileInputStream(keystorePropertiesFile))

dependencyResolutionManagement {
    repositoriesMode.set(RepositoriesMode.FAIL_ON_PROJECT_REPOS)
    repositories {
        google()
        mavenCentral()

        // Weavr GitHub Packages repository
        maven {
            url = uri("https://maven.pkg.github.com/weavr-io/push-provisioning-android")
            name = "Weavr-GitHub-Packages"
            credentials {
                username = keystoreProperties["WEAVR_GITHUB_USERNAME"] as String
                password = keystoreProperties["WEAVR_GITHUB_TOKEN"] as String
            }
        }
    }
}