Integration from Apple Wallet using Wallet Extensions
Apple mandates that you must integrate with their Wallet ExtensionsWallet ExtensionAn iOS app extension that integrates an issuer app with Apple Wallet. The UI Wallet Extension provisions a card from the issuer app into Wallet (the in-app provisioning flow). The Non-UI Wallet Extension exposes the issuer's card-management actions (such as 'View card details') from inside Wallet itself. Apple requires both for a primary issuer-app integration. before distributing an app that supports push provisioningPush ProvisioningA method that allows cardholders to add their card to a digital wallet (such as Apple Pay or Google Pay) directly from your app. The card details are securely tokenized and sent to the wallet provider, streamlining the process and enhancing the user experience compared to manual provisioning. This feature is currently in beta..
These extensions let Apple Wallet discover cards in your app that can be added to the wallet, and provision them from within Apple Wallet without launching your app.
The Wallet ExtensionsWallet ExtensionAn iOS app extension that integrates an issuer app with Apple Wallet. The UI Wallet Extension provisions a card from the issuer app into Wallet (the in-app provisioning flow). The Non-UI Wallet Extension exposes the issuer's card-management actions (such as 'View card details') from inside Wallet itself. Apple requires both for a primary issuer-app integration. described on this page are required by every Apple Pay integration. The architecture you build them into depends on which certification path you take - see the Apple Pay compliance overview for the supported paths and the requirements Apple verifies during lab certificationLab certificationThe formal test pass run by an Apple-affiliated test centre that verifies an issuer app meets Apple Pay's functional, security, and brand requirements. The test exercises every Card Lifecycle Management operation, the in-app provisioning flow, and the Wallet Extension. A successful pass is required before launching Apple Pay on a card programme; most first-time integrations fail at least one item and need a remediation round..
To implement this, you'll need to provide two extensions:
- Non-UI extension: an extension that is queried from Apple Wallet to fetch the required card metadata, and to provision the card.
- UI extension: an extension to allow the user to log in to their account within your app, if it's necessary.
The user must launch your app at least once before the extensions are recognized by Apple Wallet.
The following diagram outlines how Apple Wallet and your app interact through these extensions:
Set up your project for Apple Wallet extensions
Create the App Extensions
Navigate to your project's file on Xcode, and click on the plus icon tagged "Add a target." In the dialog box that appears, select Intents Extension as the template for your target.
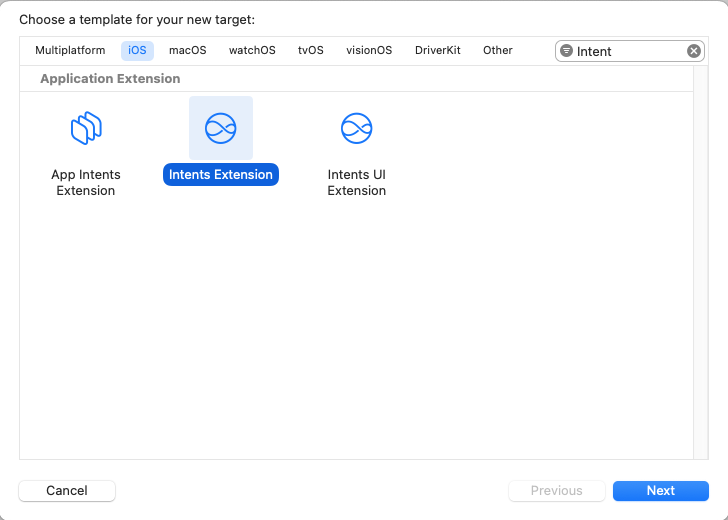
Upon tapping next, you'll need to set the following values:
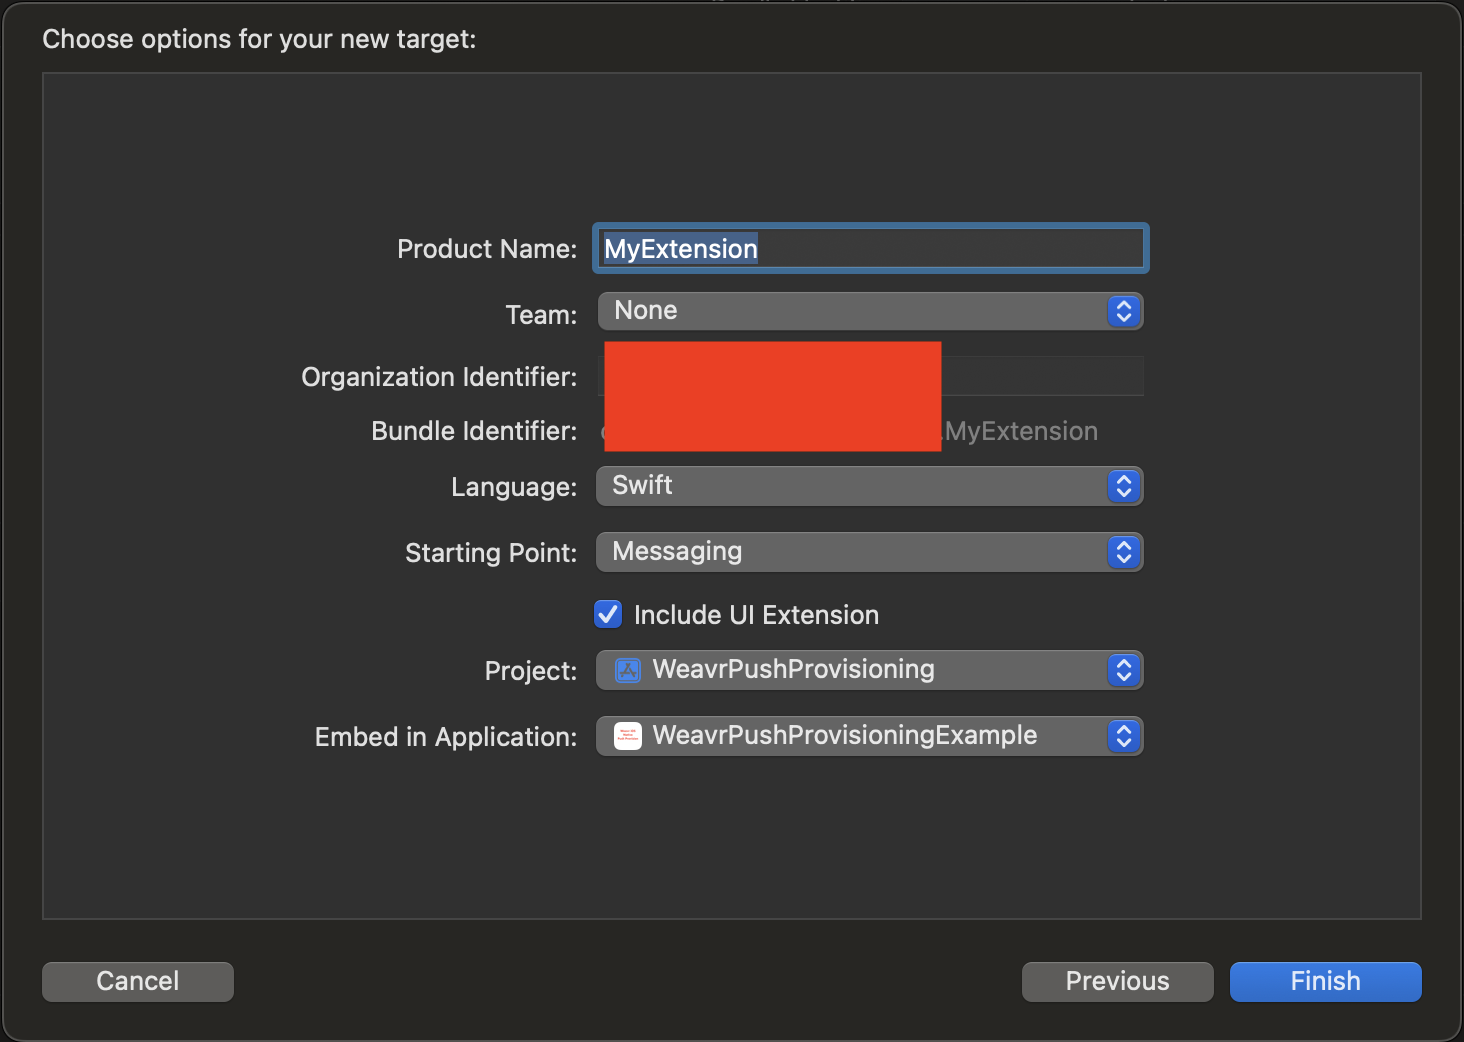
- Product Name: WalletExtension
- Team: Select your Apple developer organization
- Language: Select Swift
- Starting point: Leave Messaging
- Include UI Extension: Keep it selected
- Project: Ensure your project is selected
- Embed in Application: Ensure your app is selected
After clicking Finish, you should see two new folders within your project containing the newly created Extensions.
Once the Extensions are created, record your app, and Extensions bundle identifiers, and share them with our support team so we can add them to the allow-list for provisioning. For example:
| Bundle Identifier |
|---|
ABCDE12345.io.weavr.app |
ABCDE12345.io.weavr.app.WalletExtension |
ABCDE12345.io.weavr.app.WalletExtensionUI |
Note that we also need your team developer ID. In the example above, this is present in the prefix ABCDE12345.
Configure the App Extensions
With the Extensions created, you must configure them to work as Apple Wallet extensionsWallet ExtensionAn iOS app extension that integrates an issuer app with Apple Wallet. The UI Wallet Extension provisions a card from the issuer app into Wallet (the in-app provisioning flow). The Non-UI Wallet Extension exposes the issuer's card-management actions (such as 'View card details') from inside Wallet itself. Apple requires both for a primary issuer-app integration. rather than Messages extensions. To do so, make sure they have the following as dependencies:
PassKit.framework- And for the Non-UI Extension:
WeavrPushProvisioning- Added either via CocoaPods, or Swift Package Manager, following the same process as described in the Set up section.
Notice that you need to remove Intents.framework and IntentsUI.framework from the dependency list as these are added by the Messaging template.
Once the dependencies are set up, ensure that you have the correct capabilities configured on each Extension. The following tables outline the capabilities needed for each Extension:
App
| Capability | Set up | Reason |
|---|---|---|
| App groups | group.your.apps.bundle.id | Shares storage between your app and extensions so they can read each other's data. Note that you should replace the value with something sensible for your app. |
| In-App ProvisioningIn-app provisioningThe flow that adds a card to a digital wallet (Apple Pay, Google Pay) from inside an issuer's mobile app, using the issuer's own authentication. In Weavr's stack, in-app provisioning is implemented via our Push Provisioning SDK on iOS or React Native. | So the card can be provisioned from your Extensions. | |
| Wallet | Allow all team pass types | So the app can check if a card is already added. |
Non-UI Extension
| Capability | Set up | Reason |
|---|---|---|
| App groups | group.your.apps.bundle.id | Shares storage between your app and extensions so they can read each other's data. Note that you should replace the value with something sensible for your app. |
| In-App ProvisioningIn-app provisioningThe flow that adds a card to a digital wallet (Apple Pay, Google Pay) from inside an issuer's mobile app, using the issuer's own authentication. In Weavr's stack, in-app provisioning is implemented via our Push Provisioning SDK on iOS or React Native. | So the card can be provisioned from your Extensions. |
UI Extension
| Capability | Set up | Reason |
|---|---|---|
| App groups | group.your.apps.bundle.id | Shares storage between your app and extensions so they can read each other's data. Note that you should replace the value with something sensible for your app. |
| In-App ProvisioningIn-app provisioningThe flow that adds a card to a digital wallet (Apple Pay, Google Pay) from inside an issuer's mobile app, using the issuer's own authentication. In Weavr's stack, in-app provisioning is implemented via our Push Provisioning SDK on iOS or React Native. | So the card can be provisioned from your Extensions. |
Configure the Non-UI Extension
Update the Info.plist file of the Extension as per below:
<?xml version="1.0" encoding="UTF-8"?>
<!DOCTYPE plist PUBLIC "-//Apple//DTD PLIST 1.0//EN" "http://www.apple.com/DTDs/PropertyList-1.0.dtd">
<plist version="1.0">
<dict>
    <key>NSExtension</key>
    <dict>
        <key>NSExtensionPointIdentifier</key>
        <string>com.apple.PassKit.issuer-provisioning</string>
        <key>NSExtensionPrincipalClass</key>
        <string>$(PRODUCT_MODULE_NAME).IntentHandler</string>
    </dict>
</dict>
</plist>
This informs Apple Wallet that the Extension integrates with it via the NSExtensionPointIdentifier, and specifies which class provides the implementation; in the example this is the IntentHandler.
In order for the IntentHandler to be compatible, you need it to implement the PKIssuerProvisioningExtensionHandler protocol.
Note that if you change the name of your IntentHandler, you'll need to update the NSExtensionPrincipalClass.
Configure the UI Extension
Similar to the Non-UI Extension, update the Info.plist as follows:
<?xml version="1.0" encoding="UTF-8"?>
<!DOCTYPE plist PUBLIC "-//Apple//DTD PLIST 1.0//EN" "http://www.apple.com/DTDs/PropertyList-1.0.dtd">
<plist version="1.0">
<dict>
    <key>NSExtension</key>
    <dict>
        <key>NSExtensionMainStoryboard</key>
        <string>MainInterface</string>
        <key>NSExtensionPointIdentifier</key>
        <string>com.apple.PassKit.issuer-provisioning.authorization</string>
    </dict>
</dict>
</plist>
In this case, rather than declaring NSExtensionPrincipalClass, you are declaring NSExtensionMainStoryboard to be MainInterface. As a result, when the Extension triggers, Apple launches the initial view controller that is found inside the relevant storyboard.
In order for the initial view controller to be compatible, it needs to implement the PKIssuerProvisioningExtensionAuthorizationProviding protocol.
Configure the App Extensions in Apple Developer Portal
Next, register both App Extension bundle identifiers in the Apple Developer portal Identifiers section. Create provisioning profilesProfileA template defining the configuration for one type of object - corporate identity, consumer identity, managed account, managed card, transfer, or outgoing wire transfer. When you create one of these objects you reference its Profile ID, which tells Weavr which limits, currencies, supported countries, branding, and fees to apply. Your programme ships with one or more Profile IDs per supported object type. accordingly, with the capabilities required for each Extension.
If you have not already done so, create a new App Group, so that the app and Extensions can share storage between them. Normally, group.team-id.bundleid is the format used to identify a new group. You must ensure this value matches the App Groups of both the App, the Non-UI Extension, and the UI Extension.
Implement the App Extensions
Shared storage between app and Extensions
To ensure the proper functioning of the Wallet ExtensionsWallet ExtensionAn iOS app extension that integrates an issuer app with Apple Wallet. The UI Wallet Extension provisions a card from the issuer app into Wallet (the in-app provisioning flow). The Non-UI Wallet Extension exposes the issuer's card-management actions (such as 'View card details') from inside Wallet itself. Apple requires both for a primary issuer-app integration., your app and its Extensions must share access to certain data, such as authentication tokens and card information. This shared storage is essential for the provisioning flow, as it allows Extensions to access the data fetched or stored by your app.
Apple provides App Groups as a mechanism to enable shared storage between an app and its Extensions. By configuring App Groups, you can ensure that both your app and Extensions can read and write to the same storage location.
The implementation of shared storage varies from app to app, so the specific details are not be covered in this guide. However, it's recommended that you consider the following steps when implementing this storage:
-
Scope what data is accessible from shared storage
- It is advisable to reduce the accessibility of the data, therefore only data that is required in the extensions should be accessible to them.
- The data that is needed to provision cards is:
- The user's token
- Card data, specifically:
- Id
- Last four digits
- Card holder name
- Card description
- Card image URL
-
Update your storage layer:
- Update your storage or database layer to access storage provided by App Groups where relevant.
- Ensure that the App Group identifier (e.g.,
group.your.app.group) is correctly set up in your app and Extensions.
-
Data Migration (if needed):
- If your app is already storing data in a different location, consider implementing a migration process to transfer it to the shared storage.
-
Reuse Domain Models and Storage Classes:
- Make your domain models and storage classes accessible to both your app and Extensions so as to avoid code duplication. This also ensures consistency in how data is serialized and deserialized.
-
Test Shared Storage in the App:
- Verify that your app can write-to and read-from the shared storage without issues.
-
Test Shared Storage in Extensions:
- Confirm that your Extensions can access the data written by the app and perform their required operations.
Below are reference examples of how to use UserDefaults and FileManager to interact with shared storage:
// Using UserDefaults for Shared Storage
let sharedDefaults = UserDefaults(suiteName: "group.your.app.group")
sharedDefaults?.set("value", forKey: "key")
let value = sharedDefaults?.string(forKey: "key")

// Using FileManager for Shared Storage
if let containerURL = FileManager.default.containerURL(forSecurityApplicationGroupIdentifier: "group.your.app.group") {
     let fileURL = containerURL.appendingPathComponent("sharedData.json")
     try? "data".write(to: fileURL, atomically: true, encoding: .utf8)
     let data = try? String(contentsOf: fileURL, encoding: .utf8)
}
Implement the UI Extension
The overarching requirement of the UI Extension is that you need to have a class that implements PKIssuerProvisioningExtensionAuthorizationProviding as the initial view controller of the Storyboard.
The main requirement of this protocol is to include a completionHandler as follows:
import PassKit
import UIKit

class MyViewController: UIViewController, PKIssuerProvisioningExtensionAuthorizationProviding {

    var completionHandler: ((PKIssuerProvisioningExtensionAuthorizationResult) -> Void)?

    // ...
}
As part of this implementation, you'll need to:
- Display your app's login flow
- Wait for the user to enter their credentials
- Sign the user in
- Store your token in shared storage
- Download the list of cards for the user
- Store the cards in shared storage
- Call the completion handler and inform Apple Wallet of the result of the login flow - either
.canceledor.authorized.
App UI extension has a memory limit of 60 MB, developers are responsible to optimize the code and libraries to fit this requirement.
We recommend to stick to native iOS development to ensure you don't exceed this limit.
Implement the Non-UI Extension
The Non-UI Extension requires you to provide a class implementing PKIssuerProvisioningExtensionHandler.
The Non-UI extension has a memory limit of 55 MB, developers are responsible to optimize the code and libraries to fit this requirement.
There is also a time limit to complete each extension call by Apple.
We recommend to stick to native iOS development to ensure you don't exceed this limit.
To simplify the integration, we offer WeavrProvisioningExtensionHandler, a class that implements the logic expected from Apple, and only requires you to provide the data we need to perform the relevant logic.
The following snippet showcases how to use WeavrProvisioningExtensionHandler, leaving the implementation to fetch the relevant data up to you.
import WeavrPushProvisioning
import UIKit
import Foundation

class IntentHandler: WeavrProvisioningExtensionHandler {

    override func loadCardsFromDisk() -> [ManagedCard] {
        // TODO Load cards from your shared storage
    }

    override func loadTokenFromDisk() -> Token? {
        // TODO Load the token from your Shared storage
    }

    override func loadCardsFromNetwork() async throws -> [ManagedCard] {
        // TODO Load managed cards from API
    }

    override func uiKey() -> String {
        // TODO Return the UI key.
        // Remember to avoid committing it as it's
        // sensitive information
    }

    override func defaultCardImage() -> CGImage {
        // TODO Return the default image to use for your card.
        // If we are unable to fetch the image from the URLs you provide,
        // we'll fallback onto this one.
    }
}